In this article, we'll describe how to create a new BCGControlBar for MFC applications in Visual Studio 2017-2026 environments.
- Run Visual Studio environment.
- Choose the "File | New | Project..." menu item.
- Choose BCGControlBar Application Wizard:
- BCGPAppWizard2017: for Visual Studio 2017.
- BCGPAppWizard2019: for Visual Studio 2019.
- BCGPAppWizard2022: for Visual Studio 2022.
- BCGPAppWizard2026: for Visual Studio 2026.
- Click the "Next" button.
- Specify the project/solution name and location. Click the "Create" button.
- Now, you can specify your application's appearance, content and basic functionality.
"Application Type" page:
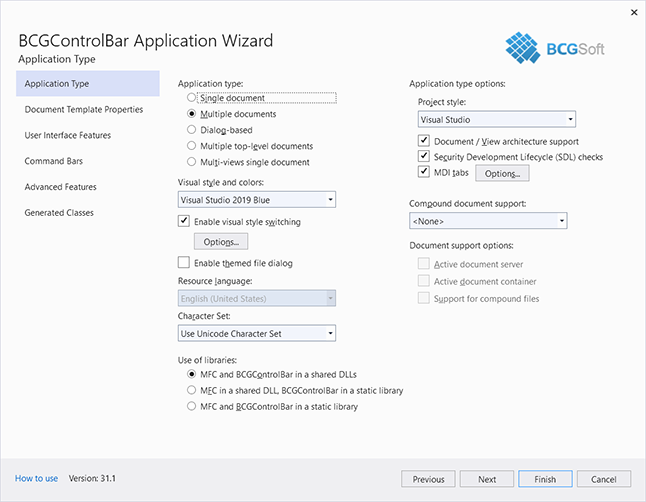
Click the "Next" button and open the Document Template Properties page:
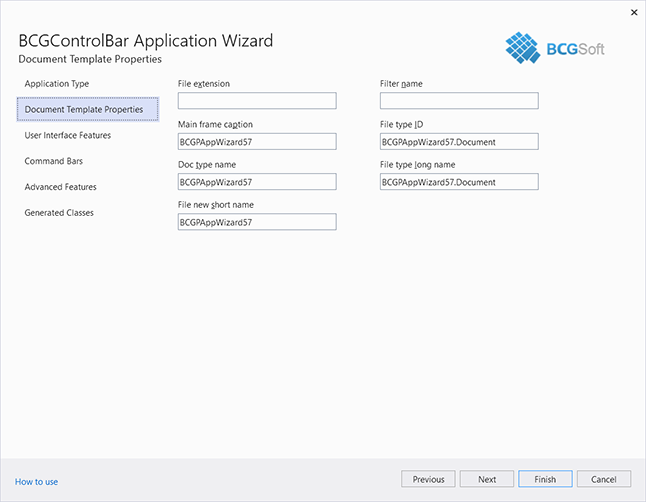
On this page of the Application Wizard, provide document template strings (available only if the application has document/view architecture support). For more details, please refer to MFC documentation.
- Click the "Next" button and open User Interface Features page:
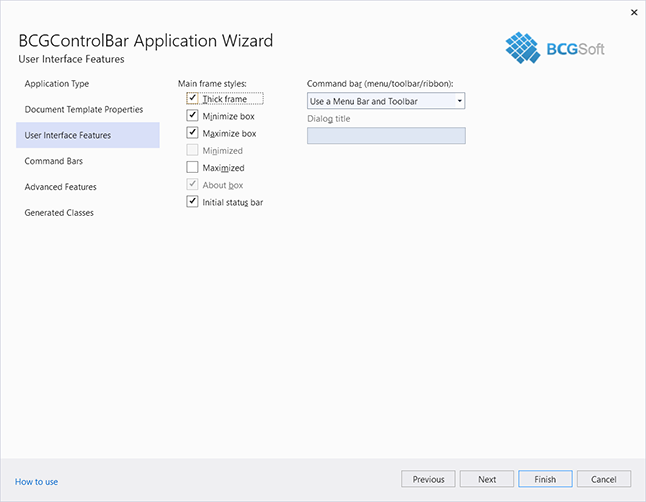
On this page of the Application Wizard, provide main application frame styles and command bar(s) that will be created in the main frame. This page contains the following sections:
- Main frame styles: sets the features of your application's main window frame. For more details, please refer to Windows/MFC documentation.
- Command bar (menu/toolbar/ribbon): this indicates whether your application includes a menu with
a toolbar, ribbon or explorer bar.
Not available for dialog-based applications. Command bar options can be specified on the next page (Command Bars).
Click the "Next" button and open the Command Bars page:
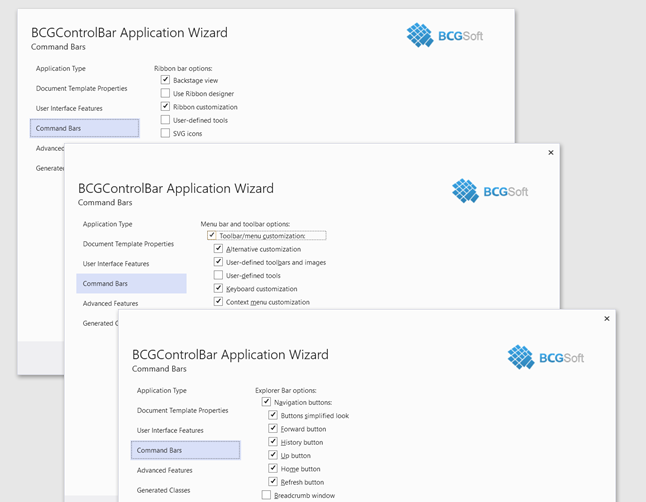
On this page of the Application Wizard, provide command bar options. Please note that the content of this page depends on the command bar type (specified on the User Interface Features page).
-
Menu bar and toolbar options:
-
Ribbon bar options:
- Backstage view: check this item if you wish to create your ribbon bar with the Backstage view.
- Use Ribbon Designer: if this item is checked, the project will be created with Ribbon Designer resources. Otherwise, the ribbon bar will be initialized in the source code.
- Ribbon customization: check this option if you want to enable the Ribbon Customization dialog.
- Context menu customization: check this option if you want to enable a context menu customization.
- User-defined tools: adds an ability to customize user-defined (usually external) tools at run-time.
- SVG icons: use SVG (Scalable Vector Graphics) ribbon bar icons. If this checkbox is unchecked, raster icons (PNG format) will be used.
- Use font icons: when this option is checked, the application will be created with Windows 10/11 font icons.
- Auto light icons in the dark themes: when this option is checked, the Ribbon icons will be automatically adapted for the dark themes.
-
Explorer bar options:
- Navigation buttons: check this item if you wish to add standard navigation buttons (such as "Back" or "Forward") to the explorer bar.
- Buttons simplified look: if this option is checked, navigation buttons will be displayed with simplified icons instead of full-color icons.
- Forward button: check this option if you want to add a "Forward" button.
- History button: check this option if you want to add the "History" menu button.
- Up button: check this option if you want to add an "Up" button.
- Home button: check this option if you want to add a "Home" button.
- Refresh button: check this option if you want to add a "Refresh" button.
- Breadcrumb window: check this option if you want to add a breadcrumb window.
- Use SVG images: use SVG (Scalable Vector Graphics) explorer bar icons. If this checkbox is unchecked, raster icons (PNG format) will be used.
Click the "Next" button and open the Advanced Features page:
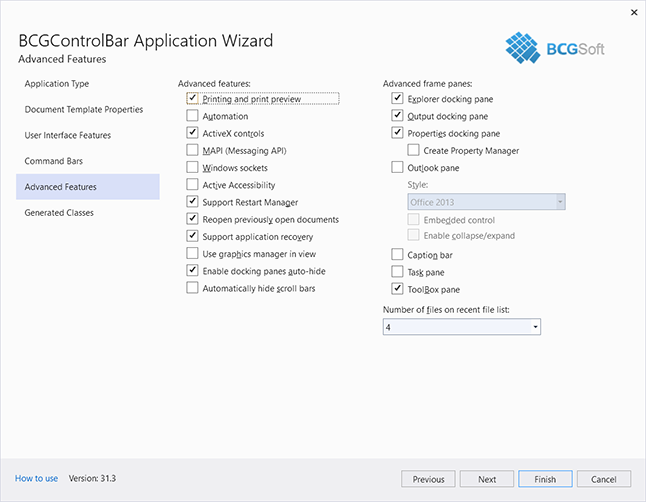
This page of the Application Wizard provides advanced features for your application, such as frame panes, printing support, and so on.
- Use graphics manager in view: check this option if you want to use a graphics manager (Direct2D or GDI+) to draw content of your CView-derived class. By default, this option is unchecked.
- Enable docking panes auto-hide: enables "Auto Hide Window" feature for all docking panes. By default, this option is checked.
- Automatically hide scroll bars: enables the auto-hidden scrollbars. By default, this option is unchecked.
- Explorer docking pane: adds an example of a workspace bar with detachable tabs.
- Output docking pane: adds an example of an output bar.
- Properties docking pane: adds a Visual Studio-style property grid.
- Create Property Manager: if this option is checked, the application will be created with a built-in property manager.
- Outlook pane: check this option if you want to add a shortcuts bar.
- Embedded control: a shortcuts bar will be created with an embedded control.
- Enable collapse/expand: check this option if you want to add a "Minimize" button to the shortcuts bar.
- Caption bar: check this option if you want to add a caption bar.
- Task pane: adds an example of the task pane.
- Toolbox pane: adds an example of the toolbox pane.
Information about other advanced options can be found in MFC Application Wizard documentation.
Click the "Next" button and open the Generated Classes page:
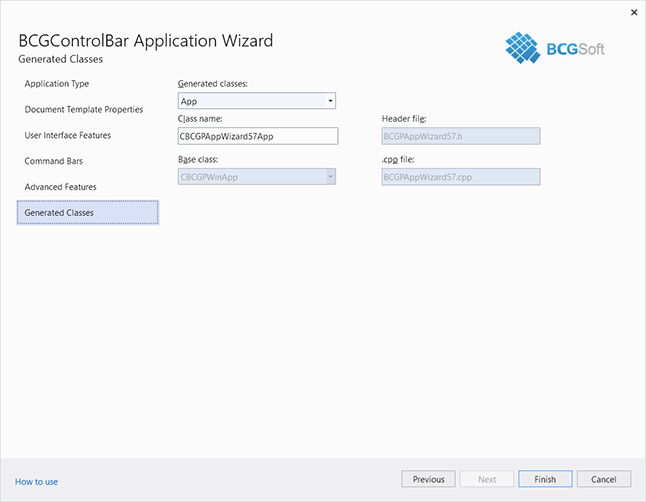
This page allows you to change the generated class or file name and the base class of your view.
- Click the "Finish" button.
Back to the Developer Area